Wednesday, June 29, 2011

Minnow Cheese: A Theme and Variations

I really hope that title didn't completely turn you off.  This is really about pimento cheese.  When Will was little, he used to think pimento cheese was "minnow cheese" and wouldn't eat it.  Now, of course, he gobbles it up, as do the rest of us Southerners.

Pimento cheese is a glorious substance that can be used in a multitude of ways.  It's delicious as a sandwich, on cracker, or on top of a burger.  I like to make a grilled cheese with it on occasion.  We L-O-V-E pimento cheese in the South.  In fact, there is a restaurant in Columbia, SC called Rockaways, and they have pimento cheese fries that I die for.  I. Die.  (Rachel Zoe fans out there?)

I wanted to make pimento cheese so that I could make sandwiches for my road trip.  I realize I was traveling by myself and still felt compelled to make two sandwiches.  Just in case, y'know?

Not content with the basic PC, I decided to make two spinoffs as well.  Hence, theme and variations.  Don't get me wrong, I love pimento cheese just about every which way.  But as we learned with the peanut butter brownies, I can't leave well enough alone.

Here we go!

Basic Pimento Cheese

You could easily use just regular cheddar, but I like the look and the taste of the white cheddar mixed in.
Pimientos, Duke's mayonnaise, and black pepper

Just so you know, it's really important you use Duke's mayonnaise.  Just kidding.  Not really.  My taste buds feel that Duke's is far superior to other mayos.  I can't help it.  In fact, my bestie, Kaitlin, and I have arguments on Duke's vs Hellmans.  There's really no contest if you ask me.  The really important thing is not to use Miracle Whip.  I can't even imagine what havoc that would wreak on your PC.

First things first, grate up your cheeses.  I've never used store-bought shredded cheese for my PC, but I imagine it wouldn't be as good.  I've never been able to find extra sharp shredded cheese, and I refuse to use just sharp in this.  It needs that extra sharp bite.
Mmmm, look at that white cheddar.

Lovingly put your cheeses into a big ol' bowl.

You might be left with some cheese nubs.  Don't try to grate them and accidentally grate your finger tips off or you will have finger nubs instead of cheese nubs.  Do yourself a favor and eat them when nobody's looking.

Add in your pimientos.  I used a jar and a half for this amount of cheese.  You're working with about 16 oz. of cheese, so you can adjust the amount according to your tastes.  I do recommend draining the pimientos first if you're using the whole jar.  Otherwise it might get kind of soupy.

Mayo time!  I used a couple of big spoonfuls.  Again, you can adjust the amount according to your tastes.  Add a little at a time because you can always add mayo, but you can't take it away once it's there.

Mix it together and add some cracked black pepper.  Yummmmmm.

That's the basic PC.  But you like a little spice you say?  You want a kick with your pimento cheese?
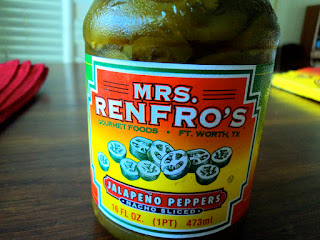
Try jalapeños!  This is what my grand-daddy added to his PC.

Looks like it's under a microscope, no?  I recommend the pickled kind because I like the vinegar-y taste they give the PC along with the heat.

Chop those suckers up and add them to the basic pimento cheese you already made.
Nom.

"But wait!" you say. "It's just cheese?  Where's the meat?!"  Actually, my dear friend, April, brought this up to me one day when I offered up some PC.  She's from Delaware, so some of the Southern things didn't make much sense to her.  I give her credit though for her love of Sugarland.

The solution?  Well, it's the solution to life quite frankly.  Bacon.  And parmesan.
Carolina Pride makes tasty bacon.  It does indeed fry crisp without burning.  You could sub in grated parm if you have it in the fridge, but I had a block already in there.

Grate yer parmesan.  I used about 1/4 cup.  Feel free to use more and add it to the basic PC.

Fry yer bacon.  I made three slices, knowing full well I would only use two.   But I lurve bacon so there.

Crisp!  Not burnt!  Carolina Pride tells no lies.  This was actually the piece I ended up eating.  Crumble the other two into your basic PC and parmesan mix.
Good golly, Miss Molly.  I want to eat the screen.  I don't blame you if you do too.  This is a judgement-free zone.
See that big ol' piece of bacon on top?  Nom.

If you need to store your pimento cheese(es), use air-tight containers.
This is about a pound of pimento cheese total.  It'll make 4-5 sandwiches, more if you don't pile it on like I do.  You can also serve it with crackers as a nice appetizer for 4 people.

The moral of the story?  Pimento cheese is like a little black dress.  It's lovely on its own, but it doesn't mind being dressed up a bit either.

Monday, June 27, 2011

Brownies and a Road Trip

Goodness gracious, I'm in Alabama!  My dear boyfriend, Will, lives in LA (Lower Alabama), so I decided to have a visit and recharge my batteries.  After 6.5 hours, I made it to Dothan.  A little note: my boyfriend is not the boy in my picture.  That would be my lovely friend, Lummy, and it's such a cute picture of us.

Y'all, I love a good road trip.  Mostly it's because I like to make lists.  Do I always follow my lists?  No, but I thoroughly enjoy making them.  I also love to plan my snacks for the trip.  I like having savory and sweet bites on the road because you never know when you're going to crave one or the other.

This trip I decided to make my favorite peanut butter brownies.  I have a love affair with peanut butter, and is there anything better than a brownie?  Will would say, yes, there are many things better than brownies.  He's a weirdo though and doesn't like them, so really, that opinion doesn't count.  I would be fine eating a brownie every day for the rest of my life.  So there.

You need:
Wet ingredients- Sugar, brown sugar, peanut butter (obviously), butter, an egg, and vanilla extract

Dry ingredients- All-purpose flour, baking soda, salt, oats

These brownies could hardly be simpler to make.  Start off by pre-heating your oven to 350º.  In a large bowl, cream together the butter and both sugars.
See that butter on the side?  It needs to be scraped down so that it can be incorporated into the mixture.  A good rubber spatula will do the trick.

Next, add in the peanut butter, egg, baking soda, salt, and vanilla extract.
Blend those in, scraping down the sides of the bowl as needed.

Our flour and oats are the last to go in.  Instead of using a mixer (or hand mixer), stir these in with your spatula or spoon.  This will prevent the glutens in the flour from getting too excited and making your brownie tough.
With a few strokes, it'll turn into...
...this lovely batter!  It's a thick batter, almost closer to a cookie.  You can see the lovely oats throughout the batter.

Spread the batter into a greased pan (8x10 is suggested).
This is not an 8x10 pan.  It's a 9x9, so the batter was spread a little on the thin side.  No worries though, it will puff up nicely regardless.

Also, I can't leave well enough alone.  I decided to experiment a little and see what happens when I add Nutella to part of the brownies.
I scooped out about 2 teaspoons of the good stuff and melted it in the microwave.
Doesn't that look tasty?  I've been known to eat it straight out of the jar.  I'd ask you not to judge me, but even I judge me for that.  Anyhow, after I melted it, I swirled it in about half of the batter in the pan.
It was a little difficult to make marble-y since this is on the thick side.  It's also kind of ugly, but it's what's on the inside that counts.  So there.

Bake the brownies for about 20-25 minutes and you'll get this.

Slice 'em up...
See dem oats?  Yum.

The top brownie has the Nutella, and the bottom is plain.  Plain but delicious.  Of course, I tasted both in the name of...science.  The plain was nice and peanut butter-y as always.  The Nutella taste wasn't as strong as I would've liked.  The obvious solution is more cowbell Nutella, and I would mix it in when I add the peanut butter to the batter.

All in all, still a tasty brownie.  Nom.

Here's the recipe in an easy-to-follow format:

Peanut Butter Brownies- makes 16 brownies*
Courtesy of Charleston Receipts Repeats


1/2 c butter  (1 stick)
1/2 c sugar
1/2 c brown sugar
1 egg
1/3 c peanut butter
1/2 tsp baking soda
1/4 tsp salt
1/2 tsp vanilla extract
1 c flour
1 c oats

  • Preheat your oven to 350º
  • Cream together butter and sugars
  • Blend in egg, peanut butter, baking soda, salt, and vanilla extract
  • Stir in flour and oats
  • Spread in a greased 8x10 pan
  • Bake 20-25 minutes
  • EAT
*I hardly ever get as much yield out of a baking recipe as I'm supposed to.  I think CRR said it made 2 dozen or something like that.  I don't know about y'all, but I like a substantial brownie.  My little square pan made it easy to cut these into 16 evenly-sized noms.  Such is life.


Sunday, June 26, 2011

Coming Soon...

I've got a long drive to Alabama, but it's worth it to see my dear boyfriend.  In a day or so, I'll be posting about peanut butter brownies and not one, not two, but three pimento cheeses.  Get ready to drool, y'all!

Wednesday, June 22, 2011

SC Bruschetta

Is there anything better than a fresh tomato?  It can be eaten by itself, with a little salt and pepper, or in a glorious tomato sandwich.  Made with Duke's Mayonnaise and white bread, of course.  Now is not the time to be getting healthful with the low-fat stuff and wheat bread.  Everything has its place.

We're fortunate to have friends whose 'mater plants are pumping out juicy, bright red tomatoes.  Let's be honest, you can tell the difference between a fresh tomato from the garden or the Farmer's Market than Wal-mart.  No offense, Wally World.  I'll still buy my canned tomatoes from you, just not my fresh summer 'maters.

So what's a girl to do with so many options?  Having some mozzarella on hand nudged me toward making a caprese salad.  But why not add some carbs when you can?  I decided to turn the simple insalata caprese into a bruschetta of sorts.  In my family, there's always at least a small crowd, so this was a nice appetizer before we ate and watched the ball game.

You need:


  • Crusty bread- It needs to be substantial enough to hold the mozzarella and tomato slices.
  • Fresh mozzarella, sliced- And by fresh I mean a ball of mozz.  You could easily use shredded though, since we're going to melt it onto the bread.  I happened to have a ball, and I like the look of it.  Use what you have on hand.
  • Balsamic vinegar- I used about 1/2 cup and reduced it
  • Tomato(es), sliced- Depending on how many bruschettas (bruschetti?) you plan on making, you may need more than one 'mater.  I made eight smaller-sized pieces, so one tomato was sufficient
  • Olive oil- The more the merrier
  • Basil- This adds a touch of herb-y freshness, and it's in season.  My grandmother has tons of basil growing, so I used some of hers.  It's not pictured because I'm a nerd and forgot it until I actually used it.
  • Garlic (optional)- It needs to be the fresh stuff.  No jarred minced garlic because you want to rub the toasted bread with a clove to impart the flavor of the garlic without biting into a raw piece.  I didn't have any this time around, so my toasts didn't get rubbed.
First things first: Cut your bread into slices. I like about an inch thick, so it's nice and hefty.  It's gotta stand up to cheese and a juicy tomato slice.  Go ahead and drizzle or brush them with olive oil.
In all honesty, I could eat them like this.  But in the interest of science, or rather yummy food for more than just myself, go ahead and stick them in a 350º oven until they're slightly golden brown.  Or hey, if you've got the grill fired up that day, try grilling the bread.  That's tasty too.  It's at this point that you would rub them with garlic if you so desire.  Go on and desire, it's de-lush-ous.

Now, it's time for the mozzarella.  Delicately place the mozzarella atop each toasty carb.  Or plop it on, it'll taste just as good.
We're gonna turn up the heat and put these under the broiler to melt the cheese and get it a little golden brown.  Nom.

Now is also a good time to reduce the balsamic vinegar if you so desire.  Again, I urge you to desire.  Simmer it over low heat until it thickens and reaches a syrup-y consistency.

Let's chiffonade some basil.  Basil is probably the easiest thing to chiffonade, and chiffonade just means cut into little strips.  Stack your basil leaves on top of each other, and roll them together tightly.

 Okay, my basil could be a little tighter than shown in the picture, and it probably was when I cut it.  It came out pretty, I promise.  Anyway, your basil I'm sure is perfectly tight (don't strangle it though, it didn't do anything to you).  Make little slices from tip to tip or moving right to left, however you prefer to think of it.
Ta-da!  Lovely strips of basil.  Boo-ti-ful.

Your cheesy bread is probably ready by now, and so is the balsamic reduction that's been going.  If not, let it percolate. I'll wait.

Okay now, it's time to assemble this bad boy.  Or bad boys, rather.  Don't burn your fingers like I did.  Ouchies.  Arrange the bruschetta on the plate or platter you'll be serving it on.
Note: I do know not to end a sentence in a preposition, but I really didn't feel like instructing you to"arrange the bruschetta on the platter on which you'll be serving it."  I really hope my high school English teacher, Mrs. Gordon, can forgive me.

If my bad grammar juju didn't completely turn you off this dish, place a slice of tomato onto each bruschetta.  Because my slices of bread were on the smaller side, half a slice of tomato covered my bread nicely.  If you have bigger slices of bread, use more tomato.

Sprinkle that lovely basil on top of each slice.  It makes for pretty garnish on the plate as well.  Give your dish a nice sprinkle of sea salt and pepper.  I'm a fan of those ginormous salt and pepper grinders.  Freshly cracked pepper just has such a nice bite to it.

Drizzle the balsamic reduction on top of the bruschetta.  Don't be shy, let it run onto the sides and settle into the plate so the bottom of the bread can soak up some of that goodness.  Another drizzle of olive oil on top will finish it off (go on, it's good for you!).  Peer pressure.

And that, is a wonderful use of a tomato.  

Monday, June 20, 2011

The Official Snack of South Carolina

I'm a Carolina girl, and I'm not ashamed to admit it.  I love the landscape, the Gamecocks, and the coast of South Carolina.  And the food.  Lord have mercy, y'all, I love the food.  And where I'm from, we like to spread the love.  Let's get it started with some boiled peanuts.

Or "bald" peanuts if your accent is on the thick side.  Don't worry, peanuts don't have hair.

The boiled peanut is the ideal summer snack.  You can eat it at baseball games, on the beach, or on your back porch sippin' on some sweet tea.  The way I like to eat a boiled peanut is to crack it open with my teeth and suck out the brine.  I'm real ladylike.  Then, I can open the peanut with my fingers, and the glistening nuggets of happiness practically leap into my mouth.  It's almost a religious experience. Actually, you can open it with your fingers to begin with, but why miss the chance to suck down some salty peanut water?

It's not hard to boil peanuts, but the product can be an acquired taste.  My brother-in-law still hasn't acquired the taste.  Bless his heart, he's a Florida Yankee, so we forgive him.  Mostly.

You need:

  • Green peanuts- these are fresh-outta-the-ground peanuts.  Please don't try to use roasted peanuts.  You will be sorely disappointed.  
  • Plain ol' table salt- 1/4 cup of salt per pound of peanuts will give you a nice, salty nut without making you reach for the sweet tea immediately after.  
Rinse your peanuts thoroughly to clear out any debris.  On a side note, I like to say "der-bis" instead of debris thanks to an old lady we saw after a hurricane once.  "Can y'all believe how much der-bis is on the ground?!" Anyway, my peanuts were pretty clean, so I just gave them a nice rinse.

Fill up a pot with water and the peanuts, and add your salt.  I had a little over 2 lbs. of peanuts, so I used a little over 1/2 cup.  It's not an exact science.

Boil your peanuts for at least 3 hours.  When they've reached the texture you like, take the peanuts off the heat and let cool in the water.

I portioned my peanuts into sandwich bags.  I like to eat them warm when they're fresh but cold isn't bad either.  In fact, to store boiled peanuts you need to refrigerate them and eat within about 10 days.  You can also freeze them for the months they won't be available.  If you leave them out, though, they'll turn slimy.  Um, ew.  But if you eat them a pound at a time like I do, that's not really an issue.

Either way, enjoy this salty snack at least once this summer!